Streamlining IT Operations: A Guide to PXE Server Setup and Security
Introduction
Have you ever wondered how OS installations or system maintenance are handled in large IT infrastructure? Picture this: you work in the IT department and are tasked with preparing laptops for new hires. These individuals will be working in different departments, each requiring a specific OS. How would you approach this task? Would you physically interact with each laptop to complete the process? Now, imagine it’s not just 10, 20, or 30 laptops but also servers, switches, routers, virtual machines, and more. The complexity becomes evident.
Enter PXE! PXE, or Preboot Execution Environment, is a standard that enables a computer to boot and load its operating system from a server on a network. Widely used in large-scale IT environments, PXE simplifies tasks such as operating system deployment, system recovery, and network-based installations. By allowing a computer to obtain its network configuration and necessary files, PXE initiates the boot process without relying on local storage devices.
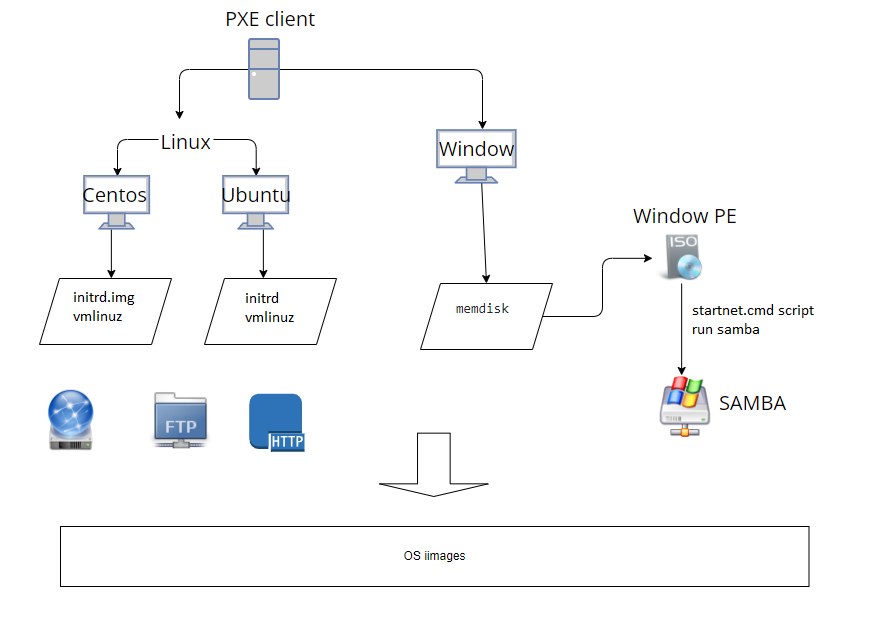 Credits for the image CC(ChenChih) on medium.com
PXE Server Setup
PXE is a game-changer for bulk computer setups, eliminating the need for individual CDs or USB drives by enabling the installation of a single operating system image on multiple machines simultaneously, saving you time and effort. It relies on a DHCP server, a TFTP server, and a web server. DHCP assigns an IP address to the computer and provides information about the PXE server, including the location of the TFTP (Trivial File Transfer Protocol) server for transferring PXE boot files to clients during the boot process.
While a web server is not strictly necessary for basic PXE functionality, it becomes essential when dealing with more advanced PXE setups and deploying operating systems that rely on retrieving files over HTTP during the installation process. The web server is primarily used to store installation files, significantly enhancing the capabilities of your PXE server.
For many operating systems, especially modern versions of Windows and various Linux distributions, the installation files are too large to be transferred via TFTP alone. A web server is used to store these large files, making them accessible to PXE clients during the installation process. Now, let’s delve into the practical aspects of setting up a PXE server.
Prerequisites
First, ensure you have the following prerequisites in place:
- Server Infrastructure:
- A dedicated server or virtual machine that will serve as the PXE server.
- Operating System:
- Choose a Linux distribution for the PXE server. Popular choices include Ubuntu Server, CentOS, or Debian.
- Network Configuration:
- Ensure a stable network with DHCP configured to allocate IP addresses to PXE clients.
- Establish an isolated network segment or VLAN dedicated to PXE-related traffic to enhance security.
Steps to Set Up a PXE Server
- DHCP Server: Install and configure a DHCP server to provide IP addresses to PXE clients. Ensure DHCP options are set to indicate the location of the PXE server and boot files.
sudo apt-get install isc-dhcp-server
- TFTP Server: Install a TFTP server to transfer PXE boot files to clients during the boot process.
sudo apt-get install tftpd-hpa
- Web Server: Set up a web server to host installation files for various operating systems.
sudo apt-get install apache2
- Configure the DHCP Server: Edit the DHCP server configuration file to include PXE-specific settings. For example, in the /etc/dhcp/dhcpd.conf file:
option domain-name "example.com";
option domain-name-servers ns1.example.com, ns2.example.com;

subnet 192.168.1.0 netmask 255.255.255.0 {
  range 192.168.1.100 192.168.1.200;
  option routers 192.168.1.1;
  option broadcast-address 192.168.1.255;
  option subnet-mask 255.255.255.0;
  filename "pxelinux.0";
  next-server 192.168.1.10; # PXE Server IP
}
- Configure the TFTP Server: Edit the TFTP server configuration file (usually located at /etc/default/tftpd-hpa) to define the TFTP root directory:
TFTP_USERNAME="tftp"
TFTP_DIRECTORY="/var/lib/tftpboot"
TFTP_ADDRESS="0.0.0.0:69"
TFTP_OPTIONS="--secure"
- Prepare PXE Boot Files: Download PXE boot files, such as PXELinux, from the official website or package repositories. Place these files in the TFTP root directory (/var/lib/tftpboot).
sudo mkdir /var/lib/tftpboot
sudo wget https://www.syslinux.org/wiki/uploads/attachments/syslinux-6.04-pre1.tar.xz
sudo tar -xvf syslinux-6.04-pre1.tar.xz
sudo cp syslinux-6.04-pre1/bios/core/pxelinux.0 /var/lib/tftpboot
sudo cp syslinux-6.04-pre1/bios/com32/elflink/ldlinux/ldlinux.c32 /var/lib/tftpboot
sudo cp syslinux-6.04-pre1/bios/com32/lib/libcom32.c32 /var/lib/tftpboot
sudo cp syslinux-6.04-pre1/bios/com32/libutil/libutil.c32 /var/lib/tftpboot
Configure Web Server: Copy the installation files for the desired operating systems (Windows, Linux distributions) to the web server root directory (e.g., /var/www/html for Apache).
Test PXE Boot:
- Start the DHCP and TFTP services:
sudo systemctl restart isc-dhcp-server
sudo systemctl restart tftpd-hpa
- Ensure the web server is running:
sudo systemctl restart apache2
- Boot a PXE-enabled client device and verify that it successfully initiates the PXE boot process.
With these steps, you’ve transformed a standard server into a PXE powerhouse, ready to deploy operating systems seamlessly across your network.
Security Considerations
Vulnerabilities
While PXE is a convenient and efficient technology, like any networked system, it comes with potential vulnerabilities. Here are some concerns and corresponding countermeasures:
Unauthorized Access: Malicious actors could attempt to gain unauthorized access to the PXE server, potentially injecting or altering boot files to compromise the integrity of the operating system installations.
Man-in-the-Middle Attacks: Attackers might intercept communication between the PXE server and client machines, allowing them to manipulate or eavesdrop on the installation process.
DHCP Spoofing: If an attacker successfully spoofs the DHCP responses, they could redirect PXE clients to a rogue PXE server, leading to unauthorized OS installations or potential exploitation.
If you want to read about a real world PXE vulnerability, check CVE-2020-3284
Countermeasures
Secure the PXE Server: Implement robust authentication and access controls for the PXE server. Regularly update and patch the server’s operating system and software to address known vulnerabilities.
Encryption: Utilize encryption protocols (such as HTTPS) to secure communication between the PXE server and clients. This safeguards against man-in-the-middle attacks and ensures the integrity of the boot files.
Network Segmentation: Employ network segmentation to isolate the PXE server from untrusted networks. This strategy limits the potential attack surface, reducing the risk of unauthorized access.
Digital Signatures: Sign boot files with digital signatures to verify their authenticity. Permit the installation of only signed and verified operating system images, thus mitigating the risk of injected or altered files.
DHCP Security: Implement DHCP snooping and Dynamic ARP Inspection (DAI) to prevent DHCP spoofing attacks. This measure ensures that PXE clients receive valid DHCP responses from legitimate servers.
Monitoring and Logging: Regularly monitor and log PXE server activities to detect unusual or suspicious behavior, providing early indicators of potential security incidents.
Firmware/BIOS Passwords: Set strong passwords for the firmware/BIOS settings to prevent unauthorized changes. This step helps protect against tampering with PXE boot settings on individual machines.
By implementing these countermeasures, you can enhance the security of your PXE deployment and reduce the risk of exploitation by malicious actors. If you’re interested in more details on security measures, Microsoft provides a set of best practices available here .
Automation
A web server enables you to host customized scripts, kickstart files, preseed files, or other configuration files that automate the installation process. This capability is particularly valuable for unattended installations and customization.
Answer files for Windows and preseed files for Ubuntu are configuration files employed in unattended installations. These files contain settings and parameters that automate the installation process, eliminating the need for user interaction during the installation of the operating system.
Answer Files for Windows
- Unattend.xml (Windows Vista and later):
- For Windows Vista and subsequent versions, including Windows Server editions, the unattended installation is typically controlled by an XML-based file called Unattend.xml.
- This file contains settings such as the product key, time zone, user accounts, and more.
Sysprep: Before capturing an image for deployment, you often use the System Preparation (Sysprep) tool to generalize the Windows installation. During Sysprep, you can specify an answer file that will be used during the next boot to configure the system.
Deployment Tools Command Prompt:
- Utilize the Deployment Tools Command Prompt (part of the Windows Assessment and Deployment Kit - ADK) to generate and work with answer files.
- Common tools include Windows SIM (System Image Manager) for creating and modifying answer files.
Preseed Files for Ubuntu
- Preseed Configuration File:
- For Ubuntu and Debian-based systems, the preseed file is used to automate the installation process.
- The file is typically named preseed.cfg or a similar name and contains instructions on partitioning, package selection, user creation, and other installation options.
- Location of Preseed File:
- During the PXE boot process, the installer looks for the preseed file in a specific location. For example, it might be located at http://example.com/preseed.cfg on a web server.
- DHCP Configuration:
- Your PXE server’s DHCP configuration should include an option to specify the location of the preseed file. For example, in the DHCP configuration, you might set:
option preseed-url "http://example.com/preseed.cfg";
Using Answer Files and Preseed Files with PXE
Create Answer/Preseed Files: Use tools like Windows SIM for Windows or manually create a preseed file for Ubuntu. These files define the configuration options for the unattended installation.
Place Files on Web Server: Host the answer file (e.g., Unattend.xml for Windows or preseed.cfg for Ubuntu) on a web server accessible to PXE clients.
Configure PXE Server: Modify your PXE server configuration to include the URL or path to the answer file or preseed file. This is typically done in the PXE server’s configuration file or DHCP options. For example, in a PXE configuration file, you might specify the location of the Windows answer file like this:
APPEND ... inst.ks=http://example.com/Unattend.xml
- In DHCP configuration, you might specify the location of the Ubuntu preseed file:
option preseed-url "http://example.com/preseed.cfg";
- Test the Installation:
- Boot a client machine via PXE and observe the automated installation process. The installer will fetch the answer file or preseed file from the specified location and use it to configure the installation settings.
Using answer files or preseed files with PXE allows for efficient and automated deployment of operating systems.
Conclusion
In conclusion, PXE stands as a testament to the evolution of IT solutions, offering a powerful tool for administrators tasked with managing diverse and extensive computing environments. It streamlines the deployment and maintenance of operating systems in a world where adaptability is key. PXE is utilized for various purposes, including operating system deployment, system recovery, maintenance, automated deployments, and imaging. I hope I have provided a comprehensive overview of this technology. I plan to build a project around it in my homelab. After creating a PXE server network and deploying several operating systems on virtual machines, I will attempt to assess the network’s vulnerabilities and then apply countermeasures to enhance the server’s security. Stay tuned and keep learning!